GST Registration Process in India: Step-by-Step Guide (2026)
Complete step-by-step guide to the GST registration process in India - portal walkthrough, documents, Aadhaar auth, ARN, GSTIN delivery, and fees.
- Complete step-by-step guide to the GST registration process in India - portal walkthrough, documents, Aadhaar auth, ARN, GSTIN delivery, and fees.
- Use this as a gst registration checklist for gst registration process in india, not as a substitute for checking current official or platform rules.
- Confirm thresholds, filing dates, forms, documents, and portal guidance against the source links before filing, buying software, changing campaigns, or changing a workflow.
To register for GST online in India: visit gst.gov.in → Services → Registration → New Registration → enter your PAN, mobile, and email → verify OTPs to get a TRN → complete the Part B form (business details, address proof, bank account, HSN codes) → verify via Aadhaar OTP → receive your ARN within minutes → GSTIN is issued within 7 working days.
The full process is 100% online, free of government fees, and broken into 8 clear steps. If you know what each screen expects — and what triggers a rejection — you can complete registration in a single sitting and get your GSTIN within 24 hours.
What is the GST registration process?
GST registration is the one-time process of enrolling your business under the Goods and Services Tax system. On successful registration, the government issues a 15-digit GSTIN (GST Identification Number) that you must print on every invoice.
The GST registration process is 100% online through the official portal at gst.gov.in. There is no government fee - registration is free. You only pay a professional fee if you hire a CA or consultant to handle it for you.
Who needs to register for GST?
- Businesses with annual turnover above ₹40 lakh (goods) or ₹20 lakh (services)
- Anyone selling on Amazon, Flipkart, Meesho, or any e-commerce marketplace
- Freelancers and consultants serving clients in other states
- Importers, exporters, and anyone doing interstate supply
- Casual taxable persons and non-resident taxable persons
- Agents, input service distributors, and e-commerce operators
Even below the threshold, voluntary registration unlocks Input Tax Credit and makes your business eligible for B2B contracts that require a GSTIN.
Benefits of completing GST registration
- Legal compliance - avoid penalties of ₹10,000 or 10% of tax due
- Input Tax Credit - claim back GST paid on purchases
- Business credibility - a valid GSTIN wins enterprise clients
- Interstate sales - sell across India with IGST compliance
- E-commerce access - required to list on any marketplace
- Faster loans - lenders trust GST-registered businesses with working capital
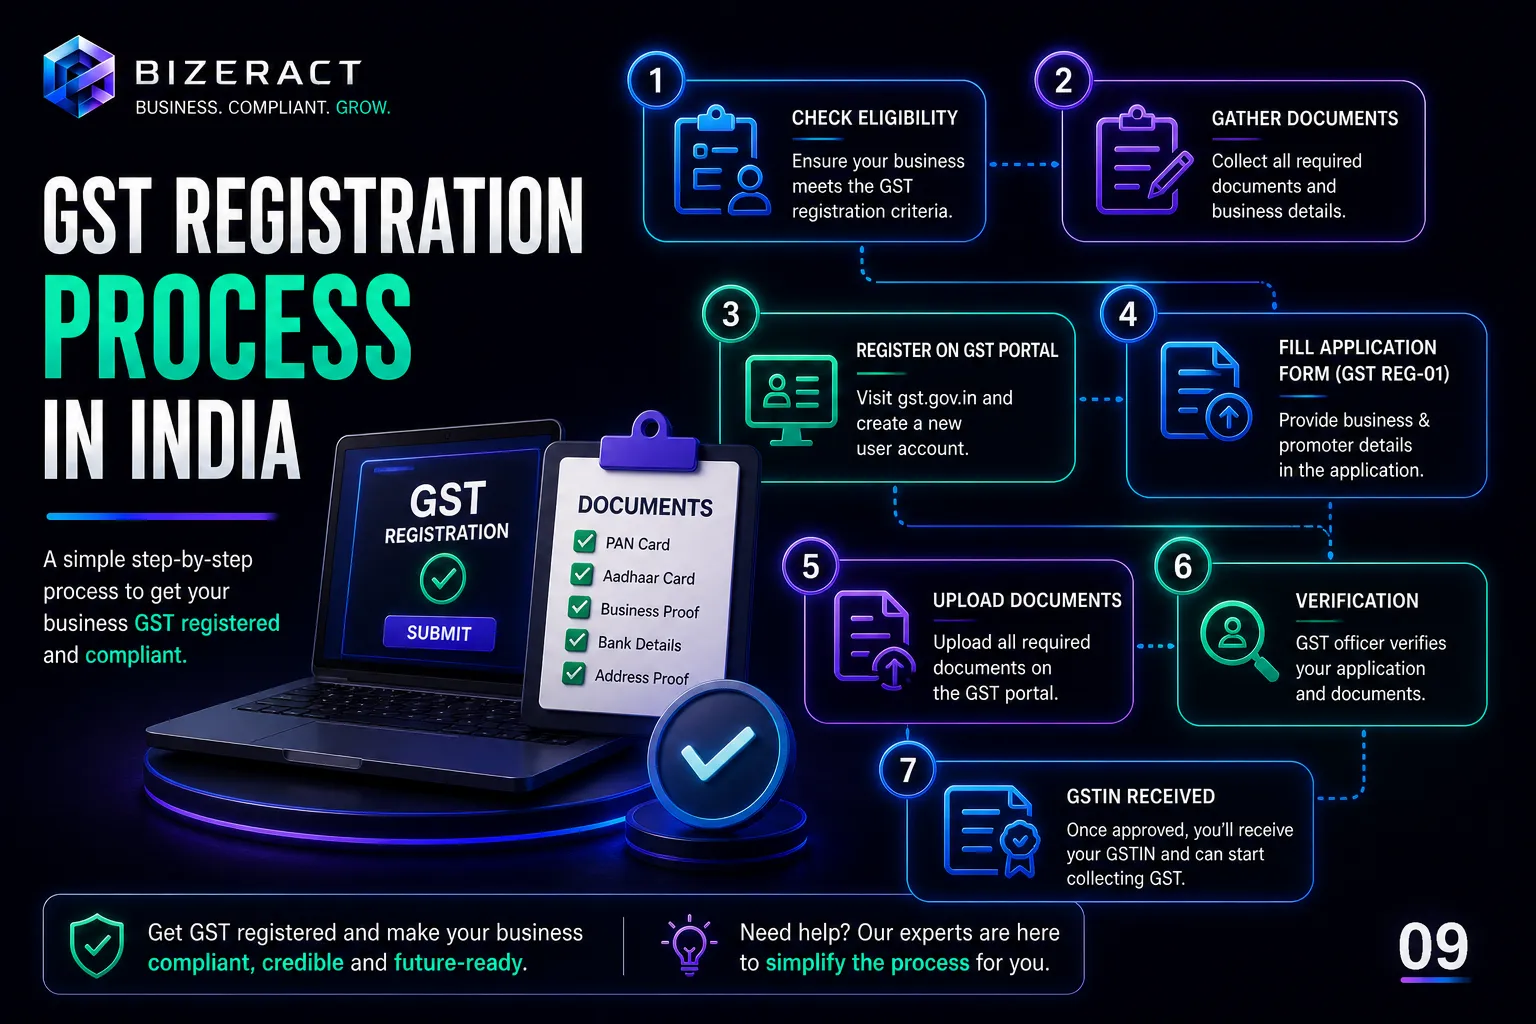
GST registration process: step-by-step
Step 1: Visit the GST portal and start Part A
Go to gst.gov.in, click Services → Registration → New Registration. Select "Taxpayer" and your state. Enter your PAN, legal name, mobile, and email.
You'll get two OTPs - one on mobile, one on email. Enter both. A TRN (Temporary Reference Number) is generated. This is valid for 15 days.
Step 2: Log in with TRN and begin Part B
Return to the portal, choose "Temporary Reference Number (TRN)" at login, enter your TRN and the OTP. You'll land on the saved application.
Step 3: Fill business details
Enter your trade name, constitution of business (proprietorship, partnership, LLP, Pvt Ltd, etc.), date of commencement, and reason for registration.
Step 4: Add promoter/partner details
For each promoter or partner: name, PAN, Aadhaar, DIN (for directors), photograph, and residential address. Aadhaar authentication happens here - make sure the name on Aadhaar matches PAN exactly.
Step 5: Add authorised signatory and principal place of business
Upload address proof: electricity bill (within 3 months), rent agreement or NOC from the owner. If there are additional branches, add them too.
Step 6: Declare goods/services and bank details
Add the top 5 HSN or SAC codes that cover your business activity. Then add your bank account number and IFSC - upload a cancelled cheque or recent bank statement.
Step 7: Verification with Aadhaar OTP or DSC
Submit the application using Aadhaar e-KYC (fastest) or Digital Signature Certificate (mandatory for companies and LLPs). On success, an ARN (Application Reference Number) is generated within minutes.
Step 8: Officer approval and GSTIN delivery
A GST officer reviews the application. With clean Aadhaar authentication, approval typically lands within 24 hours. If a Show Cause Notice is raised, respond within 7 days on the portal.
On approval, download your GST registration certificate (Form REG-06) from the portal. Your 15-digit GSTIN is live and ready to use on invoices.
Documents required for GST registration
- PAN card of the business/proprietor
- Aadhaar card of the authorised signatory
- Proof of business address (electricity bill + rent agreement or NOC)
- Bank account proof (cancelled cheque or statement with IFSC)
- Passport-size photograph of the signatory
- Incorporation certificate, MOA, AOA (for companies)
- Partnership deed (for partnerships / LLPs)
- Digital Signature Certificate (mandatory for Pvt Ltd and LLP)
For a full checklist by entity type, see our GST registration page.
Cost of GST registration in India
The government charges zero fees for GST registration. You only pay a professional fee if you outsource the work. Typical market rates:
- Freelance CA: ₹1,500 – ₹3,000
- Agencies: ₹2,000 – ₹5,000
- Bizeract ₹499 bundle: registration + 1st month filing (worth ₹1,999)
Read GST registration fees in India for a detailed breakdown.
Common mistakes to avoid
- PAN–Aadhaar name mismatch - even a middle-initial difference blocks e-KYC
- Old electricity bill - must be within 3 months
- Wrong HSN/SAC code - triggers a Show Cause Notice
- Incomplete bank proof - cheque without printed name is rejected
- Missing DSC for companies - Aadhaar OTP won't work for Pvt Ltd/LLP
- Wrong business address proof - commercial address needed for shop premises
Frequently Asked Questions
How long does the GST registration process take?
With clean documents and Aadhaar authentication, GSTIN is issued within 24 hours. Without Aadhaar auth, physical verification extends the timeline to 7–15 days.
Is GST registration free in India?
Yes, the government fee is zero. You only pay if a CA or agency handles the process for you.
Can I complete GST registration myself?
Yes, the portal is self-service. But one wrong HSN code or address mismatch can delay your GSTIN by weeks. Most small business owners outsource it for the first time.
What is ARN in the GST registration process?
ARN (Application Reference Number) is issued after submission. Use it to track your application status on the portal.
Do I need a separate GSTIN for each state?
Yes. Every state where you have a place of business requires its own GSTIN, even under the same PAN.
What happens after GST registration?
You must file monthly or quarterly returns - GSTR-1 and GSTR-3B. See our guide on GST return filing for the complete filing workflow.
Can registration be cancelled?
Yes, voluntarily via Form GST REG-16 or by the officer under specific conditions.
What should you do next?
The GST registration process is straightforward when you prepare documents correctly and know what each portal step expects. Most delays come from avoidable errors - not from the government.
Get GST registration in 24 hours at ₹499 with expert support. Our CA team handles the full process end-to-end so you can focus on running your business. Start with our 24-hour GST registration service or explore our online GST registration for pan-India applications.
What should you verify before using this GST Registration guide?
Before acting on gst registration process in india, verify the current rules or platform behavior with the GST Portal. The practical answer depends on your business model, state, turnover, documents, software stack, and whether the decision affects tax, customer data, paid media spend, or a production workflow.
Use this article as a working checklist, then confirm thresholds, registration status, return forms, document rules, and portal notices. In our audits, most expensive mistakes do not come from ignoring the whole process. They come from one stale assumption, one mismatched address, one missing event, or one automation path that nobody tested after launch.
| Checkpoint | Why it matters | Where to confirm |
|---|---|---|
| Current rule or platform status | Limits, forms, policies, and APIs can change after a blog update. | GST Portal |
| Your exact business case | A local shop, freelancer, D2C store, agency, and SaaS team rarely need the same next step. | Documents, invoices, campaign data, analytics setup, or workflow logs |
| Implementation evidence | The safest GST decision is backed by proof, not memory or screenshots from an old setup. | Portal acknowledgement, dashboard export, invoice sample, test lead, or error log |
How do we apply this in real business work?
We start with the smallest decision that can be verified. For compliance work, that means matching PAN, address, bank, invoices, and portal status before filing. For websites, marketing, analytics, and automation, it means testing the real user path from first click to final record. The boring checks catch the costly failures.
A useful rule: if a claim changes money, tax, reporting, or customer communication, keep evidence for it. Save the acknowledgement, export the report, test the form, and note the date you verified the source. That gives you a clean trail when a client, officer, platform, or internal team asks why the setup was done that way.
When should you get expert review?
Get expert review when the next action can create tax exposure, lost reporting data, ad waste, broken customer communication, or production downtime. A simple self-check is enough for low-risk learning. A filed return, new registration, tracking migration, paid campaign restructure, or live automation deserves a second set of eyes before it affects customers or records.
How often should this be rechecked?
Recheck the decision whenever your turnover, state, product mix, campaign budget, website stack, analytics property, or workflow ownership changes. Also recheck it after major portal updates, platform policy changes, annual filing deadlines, and vendor migrations. The guide is useful today only if the facts behind it still match your business.
What is the fastest safe way to decide?
Write the decision in one sentence, list the proof needed for that sentence, and verify only those items first. This keeps the work focused. If the proof confirms the decision, proceed. If one item is unclear, pause and resolve that point before changing filings, campaigns, tracking, website code, or automation logic.
What can go wrong if you skip verification?
The usual failure is not dramatic at first. It looks like a rejected application, a wrong tax invoice, a missing conversion, a duplicate lead, a broken report, or a workflow that silently stops. Those small failures become expensive when nobody notices them until month-end reporting, filing day, or a customer escalation.
What evidence should you keep after making the change?
Keep enough evidence to reconstruct the decision later. For a compliance topic, that usually means the application reference number, registration certificate, invoice sample, return acknowledgement, payment challan, notice reply, or source link checked on the day of filing. For a website, campaign, analytics setup, or automation, keep the before-and-after screenshot, test submission, dashboard export, webhook log, and the exact setting that changed.
This matters because most business fixes are revisited months later, when nobody remembers the original reason. A short evidence trail makes audits faster, handovers cleaner, and vendor conversations more precise. It also keeps the advice in this guide tied to your real operating context instead of becoming a generic checklist that gets copied without review.
- Date checked: record when the official source, dashboard, or portal screen was reviewed.
- Business context: note the entity, state, product, campaign, property, or workflow affected.
- Proof of action: save the acknowledgement, report export, test result, or live URL.
- Owner: assign one person to re-check the item when rules, tools, or business volume change.
Which next step should you take after reading this?
Turn the article into one action list. Mark what is already true, what needs proof, and what needs expert review. If you want to go deeper, compare this guide with GST Registration, GST Registration Online India, and GST Registration in 24 Hours. Then update the decision only after the official source and your own records agree.
Frequently asked questions
How can I register for GST online in India?
To register for GST online: go to gst.gov.in → Services → Registration → New Registration → select Taxpayer → enter PAN, mobile, email → verify OTPs → get TRN → complete Part B (business details, promoter info, address proof, HSN codes, bank details) → verify via Aadhaar OTP or DSC → receive ARN → GSTIN delivered within 7 working days.
How long does the GST registration process take?
With clean documents and Aadhaar OTP authentication, GSTIN is typically issued within 24 hours to 7 working days. Without Aadhaar authentication, the timeline extends to 30 working days. Low-risk applicants with output tax liability under ₹2.5 lakh/month qualify for 3-working-day fast-track approval under Rule 14A (effective November 2025).
Is GST registration free in India?
Yes, the government charges zero fees for GST registration on gst.gov.in. You only pay a professional fee if a CA, consultant, or service handles the process. Typical market rates: ₹1,500-₹3,000 for a freelance CA, ₹499 for Bizeract's bundle which includes registration plus first month filing.
What is ARN in GST registration?
ARN (Application Reference Number) is a 15-digit number issued immediately after submitting your GST registration application. Use it to track your application status on gst.gov.in under Services → Track Application Status.
Do I need a separate GSTIN for each state where I do business?
Yes. Every state where you have a place of business or make taxable supplies requires its own separate GSTIN, even under the same PAN. A business operating in Maharashtra and Karnataka needs two GSTINs.
Can I complete GST registration myself without a CA?
Yes, gst.gov.in is a self-service portal open to anyone. However, one wrong HSN code, Aadhaar name mismatch, or incorrect address proof can delay your GSTIN by weeks. Most first-time applicants use a CA or service to avoid rejection loops.
Let's talk about your business.
Tell us what you're working on and where you want to go. We'll put together a plan. No obligation, no sales pitch.
- Free 30-minute call
- A plan built around your goals
- No obligation, no pressure
- Your own account manager